Blog index
The BSOD risk of BIOS' defaults
BSOD's? Check your BIOS settings!
Summary
Loading the BIOS optimized defaults for your CPU, may, on high-end Intel systems, load the Intel Extreme profile. This is an overclocked profile that can cause system instability and probably even CPU degradation (which was promised to be solved by earlier updates). Ensure you always reset settings to true Intel stock defaults instead to ensure your system stays stable. Only overclock when absolutely needed.
If you want, you can jump directly to the Step-By-Step tutorial.
Case study: an unstable high-end PC

I am the owner of the following PC system:
- Motherboard: ASUS ROG MAXIMUS Z790 DARK HERO
- Memory: Corsair Vengence RGB 64GB (2x32GB) DDR5 DRAM
- CPU: Intel i9-14900KS,
- Video card: NVIDIA GeForce RTX 5090
This can be considered a high-end system at the time of writing. And to make sure the system would live a long and healthy life, I made sure to load the optimized default settings in my BIOS. That way, all should be well, right? Well... maybe not.
When mentioning BIOS I actually mean UEFI . UEFI is the successor of BIOS. But for old times sake I will use the word BIOS as this term is used more often and is actually used to refer to both UEFI and BIOS.
After a litte more than a year since purchase, I updated the BIOS once more (this time to version 2107). The update promised to:
1. Enhance overall system security.
2. Update the (Intel) ME Firmware version to 16.1.38.2676
And of course, after the update I loaded the optimized default settings again in my BIOS. So now I could happily resume computing again with enhanced security.
The Problem
All hell broke loose shortly after after the firmware update of my motherboard. The security may have been enhanced, but the stability? Not so much. I started getting all sorts of BSODs (blue/black screen of death). At first just once a week, then some more and at some point every reboot caused a BSOD. Some BSODs mentioned nvlddmkm.sys, others mentioned fltmgr.sys and again some others ntfr.sys. Because of that, I started doubting my video card (nvlddmkm.sys is an NVIDIA driver) and my HDD drive (fltmgr.sys and ntfr.sys are related to storage). And I started sweating like a pig.

The Search for Answers
Because all was well prior to the firmware update, my first thought was to downgrade the BIOS firmware. But this is not as easy as it seems. The BIOS can be downgraded, but the Intel ME firmware cannot. So it's impossible to restore the motherboard to a previous state.
After cluelessly and hopelessly browsing the Internet on a little tablet and typing on a frustratingly inaccurate touch keyboard, and after sending ASUS an e-mail with more spelling errors that words (thanks to those stupid touch keyboards), I started doubting my memory... I mean: my PC's memory. Especially because, according to ASUS, my memory might not be fully compatible. But I was not looking forward to a memory test that can take 8 hours or more. So I just did a quick test which did not mention any errors.
The Solution
So, being the wayward PC user I am, I looked to something else: my CPU. I noticed on the Internet that the Intel i9-14900KS is not only famous for its stellar performance, but also for its short lifespan (due to degradation issues). Luckily these issues should have been solved by earlier BIOS updates. But who knows if the degradation is truly solved? To be sure, I started 'downclocking' my CPU. I also disabled technologies that could cause big changes in clock speeds, like the Intel Turbo Boost technology.

Lo and behold: after tweaking these BIOS settings, my system was as stable as ever! Not only that, but the temperature was much lower (previously the temp could easily and often reach 100c and no sort of water cooling would lower these temps (which was normal by the way during heavy CPU usage, according to Intel). As an added benefit, the temperature in my room also lowered substantially, which seemed to be the actual cause of my earlier sweating... And to be honest I did not even notice a real performance decrease (in fact, I did not notice it at all).
The Conclusion
In the end, the issue was not truly the CPU, not my video card, not my HDD's and not even my memory (who would have thought that?). No, the the BIOS settings were to blame. Remember that I loaded the optimized default settings due to the firmware update? They are defaults indeed, but not Intel's stock defaults! Instead, the are are overclocked defaults of the Intel Extreme profile! This caused the system to become unstable.
Troubleshooting
Please expand the section you are interested in by clicking on it.
Step-by-step troubleshooting
Below I will give you a tutorial on what BIOS settings to change to improve system stability. It focuses on the Intel i9-14900KS CPU on a ASUS ROG MAXIMUS Z790 DARK HERO motherboard but the steps are often comparable with those for other Intel CPU's and motherboards. Just lookup the stock values for your CPU and set them accordingly.
Important: before making changes to your BIOS, make sure no driver updates are needed as drivers can also be causes for BSOD's.
Even More Important (for us): you tweak your system at your own risk! You cannot make any claims against us. If you desire to do so, stop reading at once! And, more importantly, ask yourself these questions: "Why am I the type that does not want to be responsible for my own problems, and prefer to make my problems someone else's problems? And where can I get help/therapy for this?" A therapist is generally cheaper than a lawsuit.
How to enter the BIOS
First you need to enter the BIOS/UEFI setup. To do that, startup/reboot your PC (which shouldn't be difficult if you have BSOD's...) and during the BIOS/UEFI splash screen, which says that you can press F2 or DELETE to enter setup, this time really press that key to enter setup. Don't be slow as you only have a short time to press it. Otherwise just keep holding DELETE. The splash screen would look something like this:

After having entered the BIOS setup, you will be greeted with a very user-friendly screen and you will likely feel right at home here... But before you start twiddling with your BIOS settings, keep in mind that changing these can cause issues. So, make sure you remember/write down your current BIOS settings before changing them so you can revert to them later.
The start screen of my ASUS BIOS looks like this:

You can navigate the settings by using your mouse and keyboard. Navigating the keyboard works using the arrow keys. To navigate through the top sections (Main, Extreme Tweaker, etc) use the LEFT and RIGHT arrow keys. To navigate the settings of each section, use the UP and DOWN arrow keys. You can select or change the value of a setting by pressing the ENTER key.
The tweaks for stability
Follow the instructions below to make your Intel system stable again:
-
First, Load Optimized Defaults from the Exit tab. Yes, we know, this is bad. But we are going to tweak things afterwards so don't worry.

-
Then, navigate to the Extreme Tweaker section in your BIOS.

-
Under Intel Defaults Settings select the Performance profile instead of the Intel Extreme profile. And under ASUS MultiCore Enhancement select Disabled - Enforce all limits.

You'll also see the Intel Adaptive Boost Technology setting. You can usually leave this to Auto or Enabled. You can choose to set it to Disabled to make sure your system is as stable as possible.
-
Scroll down a bit (either by using the mouse or pressing the DOWN key on your keyboard) and select Internal CPU Power Management.

Open it and you can see several other settings:

We will tell you which settings are important to tweak.
Maximum CPU Core Temperature and Fast Throttle Treshold. For the Intel i9-14900KS I recommend to set the maximum temperature at 98 (degrees Celcius) and the throttle temperature at 90 (degrees Celcius).
These are the temperature values at which you want the CPU to throttle down (downclocking) to prevent too high temperatures, which is good for your CPU but decreases performance.
CPU Core/Cache Current Limit Max. Set this to 307.00 for the Intel i9-14900KS.
CPU Core/Cache Current Limit Max is the maximum electrical current the CPU is allowed to draw. If the CPU reaches that limit, it reduces its clock speed to stay within it. Lowering the limit may improve system stability (lowering heat and electrical load), but also decreases performance.
Long Duration Package Power Limit and the Short Duration Package Power Limit. Set these to 253 (Watt) for the Intel i9-14900KS for both the Short and Long Duration.
The Short Duration limit determines how much power the CPU is allowed to draw (in Watt) during short boost operations. After that, it falls back to the Long Duration limit.
Scroll a bit further down and you will see the Specific Performance Core setting.

Open it and you can see several other settings: 
Core Specific Ratio Limit: the Intel CPU has Performance cores (P-cores, used for demanding tasks) and Efficient (E-cores, for general tasks). The default setting for the core ratio is Auto. On an i9 14900KS the Auto settings means a ratio of 59x for the Performance-cores. I suggest to lower the core ratio to 55 for each of your Performance-cores to improve system stability. You can keep the ratio on Auto for the Efficient-cores.
Final steps
Now save and restart your system by opening the Exit section and selecting Save Changes and Reset.

If you still got stability issues, try lowering the values for the mentioned settings.
You can also try a memory test by selecting MemTest86 in your BIOS to check if your memory is the culprit.

And if nothing helps, request a RMA (Return Merchandise Authorization) from the shop where you bought it so you can resend it to them for a check and repair.
Monitoring and getting info
You can Unify's System Information tool to monitor your CPU/motherboard and get information about them. This way you can see what voltages and clock the components are running at and compare these with what Intel recommends.

Checking for CPU degradation
If you want to know if your Intel CPU suffers the dreaded degradation, do this:
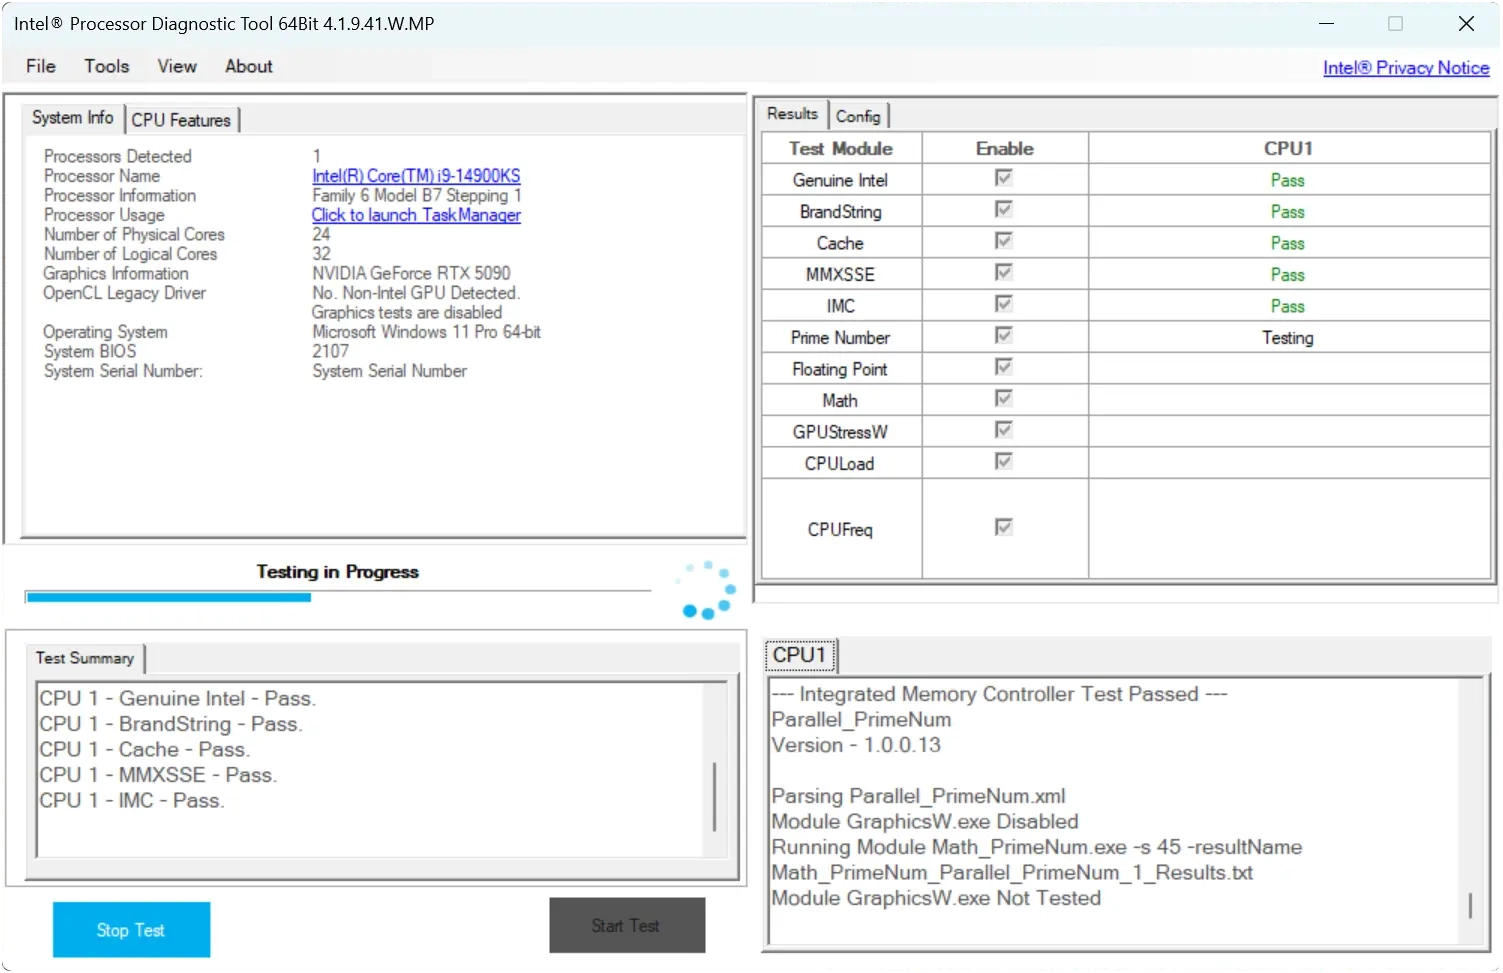
- Download Intels Processor Diagnostic Tool. There are several versions for each architecture. If you do not kow what version to download,m try the 64-bit version first.
- Install the tool using the downloaded executable.
- Run Intel Diagnostic Tool. You can startsit by clicking on the desktop icon created by the installer or by searching for it in the Windows Start menu.
- Run the test
- Evaluate. If all is well everything should say Pass. If you see a Fail this obiously means there are issues. It does not necessarily mean your CPU suffers from degradation, but it's not running well. So, maybe it's time to get a replacement or refund.
Final words
Thank you for reading and on behalf of the Unify Team we wish you a lot of solved BSOD's!

Happy tweaking everyone!